Goldtouch Mac Keyboard FAQs
GTU-MACB & GTU-MACW
GTU-MACB & GTU-MACW
Below are answers to our most commonly asked support questions we get on our ergonomic keyboards for MACs. To reveal an answer, simply click on the question. If you need additional assistance please contact us atsupport@goldtouch.com。
The insert key being used to control overtyping was disabled in these versions due to support issues.
This function can be restored by following these procedures:
Click the “Office Button”, then “Word Options”, then “Advanced” (on left menu), under the “Editing Options”, check the “Use insert key to control overtype mode” Do not click “use overtype mode” under submenu or insert key will be disabled. You will now be able to use the Insert key once you return to typing your document.
Using the GTP-0044W with the iPad or iPad 2, use the following short-cuts for special characters:
CHARACTER § 1 2 3 4 5 6 7 8 9 0 – =
OPTION § ¡ ™ £ ¢ ∞ § ¶ • ªº º – ≠
OPTION+SHIFT ± € ‹› fi fl fi fl ‡ ° · ‚ — ±
CHARACTER q w e r t y u i o p [ ]
OPTION œ ∑ ´ ® † ¥ ¨ ˆ ø π “ ‘
OPTION+SHIFT Œ „ ´ ‰ ˇ Á ¨ ˆ Ø ∏ ” ’
CHARACTER a s d f g h j k l ; ‘ \
OPTION å ß ∂ ƒ © ˙ ∆ ˚ ¬ … æ «
OPTION+SHIFT Å Í Î Ï ˝ Ó Ô Ò Ú Æ »
CHARACTER ` z x c v b n m , . /
OPTION ` Ω ≈ ç √ ∫ ˜ µ ≤ ≥ ÷
OPTION+SHIFT `¸ ˛ Ç ◊ ı ˜ Â ¯ ˘ ¿
Other Useful Shortcuts
iPAD HOME ROW INFORMATION
You can get the shortcuts without any modifications with the combinations below.
⌘ H — Go to Home Screen (Hint – If you press and hold the COMMAND key at the HOME Screen it will display these shortcuts below.
⌘ space — Search
⌘ tab — Switch App or Scroll Through active Apps
If you aren’t sure your device is equipped with Bluetooth technology, you may check your computer or device for Bluetooth capability in the Wireless and Network or Devices sections of your specific system. This will vary depending on the type of device you have, and the operating system. Please see your system documentation for specific instruc- tions for checking Bluetooth capability.
If your computer has integrated Bluetooth and it is turned on —–when you go to your Task Bar you should see the Bluetooth Devices icon, which looks like this:![]() 。If you don’t see this icon on the task bar, then your radio receiver is likely turned off or your computer does not have integrated Bluetooth capability. Many laptop computers have an On/Off switch to turn your wireless support on, please ensure the switch is in the On position. There is usually a slider switch on the front or side of the laptop.
。If you don’t see this icon on the task bar, then your radio receiver is likely turned off or your computer does not have integrated Bluetooth capability. Many laptop computers have an On/Off switch to turn your wireless support on, please ensure the switch is in the On position. There is usually a slider switch on the front or side of the laptop.
If you do not have native Bluetooth support, you may purchase our Optional Goldtouch Bluetooth USB Dongle available on our website or through our Reseller Channel. DO not use this Optional Bluetooth Dongle if your computer or device already has native Bluetooth support as it will interfere with your system’s native receiver. A system will only support one Bluetooth Receiver. Bluetooth technology supports the connection of many Bluetooth devices, one-to-many, which is different than the older 2.5Ghz wireless technology which required a dongle for each wireless device.
Please ensure that your computer or device has the latest Bluetooth Receiver drivers which should be available from your device Manufacturer’s website.
对于那些新蓝牙和你ld like to understand how it works, look no further! Think of your integrated Bluetooth Radio as a Radio Tower and your Bluetooth Device as a car Radio, in reverse. The Radio Tower is the main input device into your computer while your Bluetooth Devices are transmitting information to the tower, your Bluetooth Radio. The commonality between these scenarios is that in both cases — the tower and your Bluetooth Radio — are the most important factors in determining how your devices are working and responding. Your car radio would not work properly if the radio station you were listening to had a bad transmission tower. The same is true of your computer if it has an improperly functioning radio due to faulty and outdated drivers — your paired devices will not work properly. This is whythe most common causes for Bluetooth related performance issues on Windows Operating System are outdated system drivers.
Make sure if your system has an integrated Bluetooth Radio that you have the latest OEM drivers installed. These Drivers are available on your computer manufacturer’s site. We have a few of them listedherefor quick access. Please note that Windows Update will not identify or install these drivers, they must be downloaded directly from your computer manufacturer’s support site.
We have some very good videos on Bluetooth Basics that are available on our Support Site:
Bluetooth Basics 1: Intro to Bluetooth and Radio Drivers
Bluetooth Basics 2: Updating drivers and power management
Bluetooth Basics 3: Troubleshooting Bluetooth on a Mac
Also we have some specific instructional and troubleshooting videos on pairing Bluetooth Keyboard and Mice to your PC or Mac:
How to connect a Bluetooth keyboard to Windows 10
How to pair your Go!2 Mobile Keyboard with Mac OS
How to pair your Bluetooth mouse in Windows 10
How to pair your Bluetooth mouse in Mac OS
See ourSupport Page FAQsfor more information on how to update your computer’s Bluetooth Drivers or email support@goldtouch.com for further information.
If your MAC is experiencing frequent disconnects, your keyboard is producing multiple characters, not responding, sluggish, etc. Please proceed with the steps below or watch the videoBluetooth Basics Part 3: Troubleshooting Bluetooth on a Mac。
If you have upgraded your computer from a previous version of OSX you may need to run the SMC and PRAM reset. These resets are usually suggested when your device is exhibiting the symptoms above. The resets will reconfigure your system’s hardware and software to ensure they are functioning correctly.
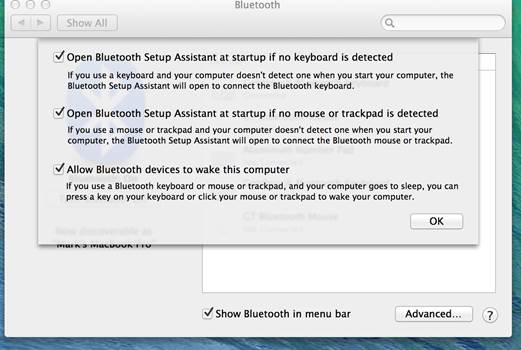
1) Check your System Preferences\Bluetooth\Advanced and make sure Allow Bluetooth Devices to Wake Computer is checked.
The SMC and PRAM resets below are particularly important steps if you have upgraded your current OSX from a previous version. You may need to re-pair the keyboard after these steps. Please note that both the SMC and PRAM reset only have 1 instruction set. The multiple SMC instructions cover systems with both removable and non-removable batteries as well as the desktop version….only (1) SMC reset and (1) PRAM reset are necessary.
2) Next, reset your System Manager Controller (see below)
The SMC reset and PRAM are applicable to both Mavericks, Yosemite and El Capitan, particularly if you have upgraded from a previous version of OSX.
This fix alone has worked for some other users:Reset the System Management Controller (SMC) Many users have reported that the SMC and PRAM Resets have corrected connectivity issues.
Resetting the SMC on portables with built-in batteries:1. Shut down the computer. 2. Plug in the MagSafe power adapter to a power source, connecting it to the Mac if its not already connected. 3. On the built-in keyboard, press the (left side) Shift-Control-Option keys and the power button at the same time. 4. Release all the keys and the power button at the same time. 5. Press the power button to turn on the computer.
Resetting the SMC on Mac portables with a battery you can remove:1. Shut down the computer. 2. Disconnect the MagSafe power adapter from the computer, if it’s connected. 3. Remove the battery. 4. Press and hold the power button for 5 seconds. 5. Release the power button. 6. Reconnect the battery and MagSafe power adapter. 7. Press the power button to turn on the computer.
Resetting the SMC for Mac Pro, Intel-based iMac, Intel-based Mac mini, or Intel-based Xserve:1. Shut down the computer. 2. Unplug the computer’s power cord. 3. Wait fifteen seconds. 4. Attach the computer’s power cord. 5. Wait five seconds, then press the power button to turn on the computer.
3) Lastly, you can reset the PRAM. If the SMC Reset did not correct this step will correct it.
Reboot After the SMC and PRAM reset. You may need to re-pair the device after reset. If so, first, remove the keyboard from your Bluetooth Devices and then run through the items below.
During the Re-Pairing process it is very important with any 3rdparty wireless device (not made by Apple) that the device be in pairing mode before you put your Mac in discovery mode.If you put the Mac in discovery mode prior to engaging the pairing button on the keyboard, the results will be random.
On the Mac:
1) Go to System Preferences/Settings
2) Press Connect on your Keyboard
3) Select Bluetooth from the Settings list
4) The Mac automatically goes into search mode when you press Bluetooth.
5) Once your PC has recognized the device, you will be presented with a pairing code.Enter the pairing code on the Bluetooth keyboard and press Enter on the GTP-0044W.
6) Please allow time for your system to automatically install the proper drivers for your new keyboard. This can take up to 60 seconds.
The Goldtouch Adjustable Keyboard, being a based on a standard keyboard layout using standard device drivers, works under the following Operating Systems:
Windows XP
Windows Vista
Windows 7
Windows 8
Windows 10
Windows Server 2003 and 2008
Mac OS X 10.4 and later
Because each keypad has firmware specifically for the proper Operating System and Hardware function, the keypads cannot be interchanged. While some functions may work properly, generally, you will have issues with the PC version of the keypad on a Mac or the Mac version of the keypad on PC. Certain functions will not work properly, particularly in Excel. Additionally, the Mac keypad does not have a NUMLOCK key so it cannot be “Turned On” on a PC.
We recommend a Mac version if you have a Mac and a PC version if you have a PC. The PC versions are, GTC-0077 (Black) or GTC-0033 (White) and the Mac versions are GTC-MACB (Black) or GCT-MACW (White)
The only “interaction” you should ever see between the your keyboard and keypad is you will note the numlock light blinking on the keyboard when pressing a key on the keypad. It is actually normal for the Numlock light to blink on the keyboard when pressing a key on an external keypad. Any external numeric keypad does a buffering process with your computer and OS so that it does not conflict with other devices that have numeric keypads. You will notice when you press a number on an external keypad that you will see a message on your computer screen, NUMLOCK On, quickly followed by Numlock Off when the key is released. Likewise, your keyboard is also reporting this input when the light comes on and goes out. The Numlock light coming on momentarily on the keyboard is simply a reporting response to the input on the keypad, it is not adding any functions or commands, only reporting what it is “seeing”. All keyboards with a numeric keypad will respond exactly the same way. If the NUMLOCK light is staying on and leaving the keyboard in Numlock mode, that is another issue unrelated to the above FAQ description.
Engage the Embedded keypad on keyboard:
The Goldtouch Mouse is a WHQL Certified, Plug and Play device. Windows will automatically detect the device and install the appropriate Microsoft drivers.
Please note that the Optional Goldtouch Dongle should only be used on systems that do not have native Bluetooth Support. Do not use the optional dongle if your machine already has Bluetooth support. A computer can only support one Bluetooth Receiver, as Bluetooth establishes a one-to-many relationship with multiple devices rather than one-to-one relationship that is typical with a 2.4Ghz wireless dongle.
Before you go to the pairing process, please validate that your computer has, or does not have, Bluetooth support. If your computer already has integrated Bluetooth and it is turned on — when you go to your Task Bar you see the Bluetooth Devices icon which looks like this:
![]()
If you don’t see this icon on the Task Bar then check within Control Panel under Device Manager. You will see an “OEM Bluetooth Radio” i.e Intel, Broadcom, etc. and Microsoft Bluetooth Enumerator. (When your system has a Bluetooth Dongle connected, you will see Generic Bluetooth Driver and Microsoft Bluetooth Enumerator.
Please check your computer manufacturer details if you are not sure whether your computer has Bluetooth Support.
Two things can cause the most common Bluetooth Issues, your Bluetooth Radio Drivers and your Power Management Settings. If you are experiencingjittery motion, lags, button responsiveness problems or other strangeness, that usually indicates the Bluetooth Radio Drivers on your system。If your devices randomly disconnect and will not re-connect without a system reboot or turning off and back on the peripheral devices, Power Management is the culprit. Power Management settings may also contribute toward lagging and unusual behavior if you are allowing your Bluetooth Radio to sleep. The 3 steps below outline Bluetooth Driver updates, pairing and Power Management Settings.
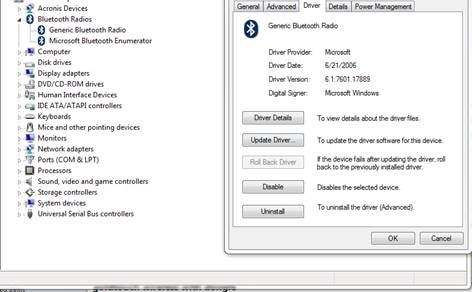
Validate current Bluetooth Radio Drivers and proper BT Radio function. To do this – Check your Device Manager settings in Control Panel.
You should see the following under Bluetooth Radios. If you are using a 3rd party Bluetooth Dongle you will see Generic Bluetooth Radio and Microsoft Bluetooth Enumerator. If your system has integrated Bluetooth you will see your “OEM/Bluetooth Radio Driver” rather than Generic Bluetooth Driver. In either case,you should see a Bluetooth Radio and the Microsoft Bluetooth Enumerator。Check the driver version under Driver Details.
请注意,Windows更新或搜索后期st drivers will not identify the right OEM drivers for your system (i.e., Dell, Lenovo, HP, etc). Therefore clicking Update Driver in Device Manager view will not identify the right OEM drivers for your system. Windows only looks to see if it has a better driver embedded in the original Windows install files or on Microsoft’s support site.
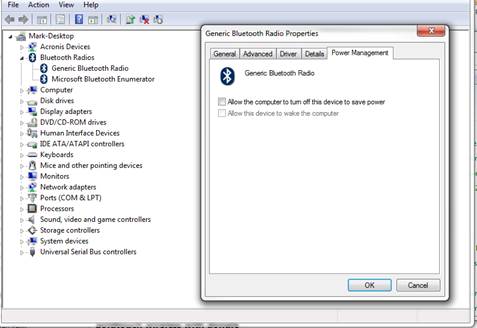
Make sure “Allow this computer to turn off this device to save power” is NOT checked on the Bluetooth Radio (Below)
Pairing Process

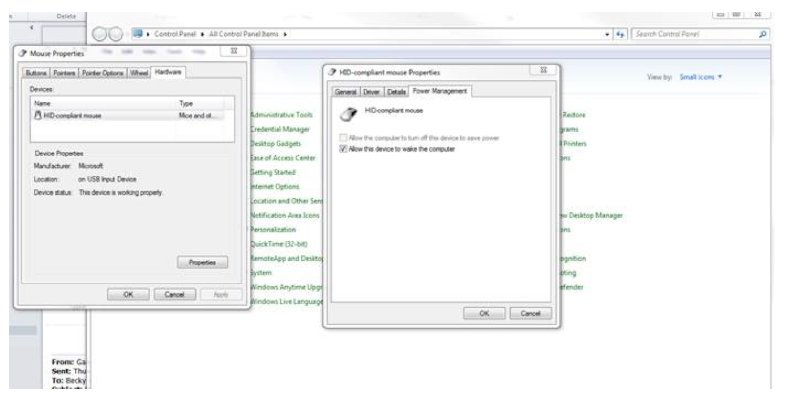
Device Manager\Mice and other pointing devices, Power Management settings.
Note you may see more than one mouse listed if your laptop or computer has an integrated mouse or another mouse attached…Make sure that all pointing devices under this section are set for Allow This Device to Wake the Computer…
If you are on Windows 10, you may not see the option for “Allow This Device to Wake the Computer” under Mouse and other pointing devices. Microsoft has changed the behavior of input devices for Windows 10 in some cases so they re-connect by default. If you are on Windows 7 or 8/8.1, you should see the option “Allow This Device to Wake the Computer” under the Mice and other pointing devices.
Make sure that Allow this device to wake the computer IS checked….

The buttons are programmable through the use of the native Windows mouse properties. Go to Control Panel\Mouse to access these features. The native operating system options provide very basic choices such as switching the primary and secondary button. If you need more granular options we recommend the use of third party software such as X-Mouse. Goldtouch cannot provide technical support for third-party software.
All our products are WHQL compliant so it is plug and play and utilizes native Microsoft Drivers. The mouse will show up in Device Manager as an HID-compliant mouse. Typically a device not staying connected is the result of Power Management settings, if the device is not set to Wake the Computer, it will become idle after sleep or hibernation mode and you will have to turn the device off and then back on to register. If this is happening, it is likely Power Management settings.
Below are instructions for configuring the Power management options for Windows 7, Vista and XP.
Further Consideration for Mac Users using Mountain Lion or earlier versions of OSx.
Third-party wireless devices need to be added to user Favorites to re-connect to your Mac after re-starting, or Sleep/Hibernation modes. To do this, follow the steps below.
In most cases these jittering issues are the result of an older Bluetooth Receiver/Radio Drivers, particularly those dating to 2010 or earlier. We use the very latest Bluetooth Chip in the mouse and it is very stable across platforms, however, its performance is still contingent upon the client side drivers. Check your computer manufacturer’s website (we link to some of the most popular siteshere) to determine whether you have the latest Bluetooth Drivers, and, we strongly recommend updating the Bluetooth Driver to the latest version. Please reboot your system after driver installation.
If you are using our Optional Bluetooth Dongle, this step in not necessary as the dongle utilizes native Microsoft Drivers for the Broadcom 2.0 Dongle. These drivers are kept up to date by Microsoft and delivered via Windows Update.
This problem is typically the result of interrupting the driver installation process during pairing. If this happens, remove the mouse and re-pair the device. Make sure you give the driver update process enough time to complete.
如果你有Windows 7,你应该看到了installation process spinning away on the Task Bar, then Bluetooth configuration will run on some machines depending on their specific BT driver, and then the mouse will be ready to use. This process can take from 30-60 seconds to complete.
You may also need new batteries.
You may want to look at the mouse pad surface or check whether the mouse is being left flat on the mouse pad when not in use. If the mouse is either hanging over the edge of the mouse pad or placed in an angled position where part of the mouse was on the mouse pad and the other part was resting on the desktop, then the mouse will not sleep. A shiny, reflective surface such as glass can also significantly reduce the battery life due to reflections confusing the sensor. Even a shiny mouse pad… The Bluetooth works well on the Goldtouch Mouse pad.
The mouse will go into sleep mode within several seconds of detection that the sensor is not receiving new data, i.e. the mouse is not moving. If the sensor is unable to detect that it is in a stationary position due to the conditions mentioned above, then the sensor will continue looking for a surface to refer to rather than go into sleep mode. Thus, reducing battery life from months to days…
When traveling with the mouse it is best to shut the power off. Like with a reflective surface, if the mouse is not able to focus on a surface in your travel bag, it will continue searching for a suitable surface to focus on rather than going into Sleep mode.
Two things can cause the most common Bluetooth Issues, your Bluetooth Radio Drivers and your Power Management Settings. If you are experiencingkey stuttering, key buffering, lag, repeats or other strangeness, that usually indicates the Bluetooth Radio Drivers on your system。If your devices randomly disconnect and will not re-connect without a system reboot or turning off and back on the peripheral devices, Power Management is the culprit. Power Management settings may also contribute toward lagging and unusual behavior if you are allowing your Bluetooth Radio to sleep. The 3 steps below outline Bluetooth Driver updates, pairing and Power Management Settings.
Validate current Bluetooth Radio Drivers and proper BT Radio function. To do this – Check your Device Manager settings in Control Panel.
You should see the following under Bluetooth Radios. If you are using a 3rd party Bluetooth Dongle you will see Generic Bluetooth Radio and Microsoft Bluetooth Enumerator. If your system has integrated Bluetooth you will see your “OEM/Bluetooth Radio Driver” rather than Generic Bluetooth Driver. In either case,you should see a Bluetooth Radio and the Microsoft Bluetooth Enumerator。Check the driver version under Driver Details.
请注意,Windows更新或搜索后期st drivers will not identify the right OEM drivers for your system (i.e., Dell, Lenovo, HP, etc). Therefore clicking Update Driver in Device Manager view will not identify the right OEM drivers for your system. Windows only looks to see if it has a better driver embedded in the original Windows install files or on Microsoft’s support site.
Make sure “Allow this computer to turn off this device to save power” is NOT checked on the Bluetooth Radio (Below)
Pairing Process (You may or may not have to re-pair after Bluetooth Radio Driver updates.)
Pair the keyboard, This can take up to 60 seconds. If you do not wait for the drivers to update, the device will be visible but will not work.
Your computer will report, “The Device Has Been Successfully Installed” at that point you may proceed.
Next, Under the Keyboard devices. Note you may see more than one keyboard listed if your system has another keyboard connected…Make sure that all devices under this sections are set for Allow This Device to Wake the computer..
Make sure that Allow this device to wake the computer IS checked….

The insert key being used to control overtyping was disabled in this versions due to support issues.
This function can be restored by following one of these procedures:
For Outlook 2007:
点击“工具”,然后“选项”,然后是“拼写”tab, then “The Spelling and Autocorrection” button, then “Advanced” (on the left side pane), under the “Editing Options” check the “Use the insert key to control overtype mode.” Do not click “use overtype mode” under submenu or insert key will be disabled. You will now be able to use the Insert key once you return to typing your document.
For Outlook 2010:
首先启动一个新的信息,然后单击“文件”,then “Options”, then “Mail”, then “Editor Options”, then “Advanced” and then check “Use the Insert key to control overtype”. You will now be able to use the Insert key once you return to typing your document.
Follow the steps in the link below to fix a corrupted Word Data Key. Microsoft provides a Fix-It Utility, or, manual steps to correct a corrupt Word Data Key at the following link:https://support.microsoft.com/en-us/help/822005/how-to-reset-user-options-and-registry-settings-in-word
One of the symptoms of a corrupted Word Data Key is that incorrect characters are typed into MS Word, or MS Outlook only if using Word as your default editor.
Some Power management Settings in the Computer System BIOS and in combination with Windows Power Management Settings can cause the USB ports to provide limited or insufficient power needed to operate USB devices.
The system BIOS must be configured for S1 suspend mode. The wake key does not work when the BIOS is configured for S3 standby because the keyboard is not powered. This is normal. The system fans are typically off during S3 standby.
Please refer to your computer system manual or contact your system manufacture for assistance with BIOS setting adjustments.Note: we are not responsible to damages to your computer system if BIOS settings are adjusted incorrectly.
The power management setup instructions vary depending on the Windows Operating system you are using.
Below are some instructions for configuring the Power management options for Windows 7, Vista and XP.
There are 2 possible solutions for this issue:
1. The device is not configured to wake the computer.
Note: If this setting is not present, your OS may not support it, or it is disabled in your BIOS. Steps to checking/updating BIOS settings are below in Solution #2.
2. The BIOS is not configured to allow USB devices to wake the computer. Only perform these steps if method 1 was not successful.
Every computer manufacturer has unique settings in the BIOS, and many users are unfamiliar with these settings. This is just a general guideline for attempting resolution to this issue via BIOS settings.
NOTE: You may need to perform Solution #1 steps subsequent to final resolution.
The Numlock Function is controlled by the system BIOS. Most computer manufactures allow for the Numlock feature to be Enabled/Disabled from within the system BIOS. This disables the Numlock at the most basic hardware level, prior to the operating system loading.
Essentially the system BIOS “tells” your keyboard to turn on NUMLOCK at boot time or , when your system comes out of sleep or hibernation mode. On most standard keyboards this feature is never noticeable because the keypad is separately integrated into the keyboard. The Goldtouch keyboard has a keypad integrated into the right side of the keyboard, turning the keyboard itself into the keypad. This can be problematic when trying to enter passwords at login time. Usually the NUMLOCK can be turned off by pushing the NUMLOCK key to get around it at power up or boot time but some BIOS’s do prevent the bypass until the system gets past the initial system POST.
There are two places where the NumLock on/off can be configured. One is in the System BIOS and the other is the system Registry. The ideal change to make is the System Bios, not the Registry, as the BIOS also affects how the computer behaves when coming out of sleep or hibernation mode.
1)System BIOS Change
Most computer manufactures allow for the Numlock feature to be Enabled/Disabled from within the system BIOS. This disables the Numlock at the most basic hardware level, prior to the operating system loading.
System BIOS settings are typically accessed by hitting a certain key (like F2) when the system first comes on (a computer typically has a message on the screen at boot regarding which key, or key combination, to press to enter Bios Settings/System Configuration), this is where your NumLock setting is coming from. Each manufacturer is different so you may need to refer to the machine’s manual for BIOS configuration options for the exact process.
There will be a setting under your BIOS/Peripherals/Keyboard that sets whether NumLock is on or off at system boot. The only options are typically NumLock On or NumLock Off. These options are reapplied after the system comes out of sleep mode so changing the BIOS is the best option available.
2)Registry Update(Use this option only if turning off the NumLock feature in System BIOS above does not work).
The second place the Numlock can be set is in the Operating System which you will note, turns on the Numlock after Windows start (you see the Windows Login screen). To configure the NumLock feature within Windows use the following procedure.
Note -Please do not modify the Windows Registry unless you are familiar. We are not responsible for any damage to your Operating System when modifying the Windows registry.
Please use the following string to adjust the Numlock settings for Windows:
Your System Administrator may need to perform these steps, as it may require Administrator privileges.
To disable NUM LOCK before a user logs on, follow these steps:
We have seen issues with Pre-Boot Authentication (PBA) environments with certain computer manufactures (Toshiba) due to the lack of BIOS options for enabling/disabling Numlock at the boot level.
We have discovered that the BIOS will send Numlock (ON) calls to the PBA causing the Numlock feature to remain on. This causes the Function enabled 10-Key to be enabled when the user is entering the PBA Password.
We have tested this extensively and discovered that it is not a problem with the PBA Client, or the Keyboard, but a limitation caused by the limited BIOS options.
Please Note: This FAQ is most relevant for the KFK model keyboard with the PS/2 connector.
Make sure the keyboard is connected directly to the computer systems PS/2 or USB port depending on which Keyboard model is being used.
We have seen some issues with using a PS/2 to USB adaptor. Please use a PS/2 to USB Converter as it not only changes the Plug type to fit the computer system, it includes smart circuitry to convert the signals.
If you have ruled out the Converter and have tried all possible ports on the computer system, try connecting to a different type of computer to determine if the issue is the computer system or the keyboard.
We have received positive feedback from customers using the following Converter:
This is commonly an issue with the motherboard. The motherboard needs to be reset, and will only reset if the computer is completely disconnected from its power source.
To resolve the problem follow these simple steps:
Desktop Computer:
Laptop Computer:
TheGoldtouch Adjustable Keyboard, being a based on a standard keyboard layout using standard device drivers, works under the following Operating Systems:
Windows XP
Windows Vista
Windows 7
Windows 8
Windows 10
Windows Server 2003 and 2008
All flavors of Linux
All flavors of Unix
System Requirements
Goldtouch V2 Adjustable Comfort Keyboard – PC Only (Includes USB and PS2 Connector) is compatible with the following operating systems:
Windows 2000, XP, Vista, Windows 7, and Windows 8
The GTN-0099 has USB or PS2 Port Connectivity
Dimensions
Width: 16 1/4 inches
Depth: 6 3/4 inches
Height at home row: 30 mm or 1 1/4 inches
Weight: 3.3 lb.
Activation Key Force: 36g-42g average
Travel Distance: 3.6mm, +/- .5mm
The Goldtouch GTU-0088 V2 Adjustable Comfort Keyboard has the following specifications:
System Requirements
The Goldtouch V2 Adjustable Comfort Keyboard -PC & Mac Compatible (USB) is compatible with the following operating systems:
Windows 2000, XP, Vista, Windows 7 and Windows 8
Mac OS 10.4, and newer
USB port
Dimensions
Width: 16 1/4 inches
Depth: 6 3/4 inches
Height at home row: 30 mm or 1 1/4 inches
Weight: 3.3 lb.
Activation Key Force: 36g-42g average
Travel Distance: 3.6mm, +/- .5mm
The Goldtouch GTN-0099 and GTU-0088 V2 Adjustable Keyboard share the following additional speicifcations:
The key switch life is 10 million keystrokes.
The Goldtouch Keyboard is continuously adjustable in the range 0° to 30°, both horizontally and vertically. Its dimensions vary due to this adjustability.
The keyboard has also been designed to disperse the workload to both left and right hands. On the standard keyboard most of the work is on the right side. The Goldtouch Keyboard has placed some of the keys such as the Home, Insert, End, Page Up, Page down and delete key on the left side to give more balance to the work.
Electrical Specifications:
Maximum rating D.C 12V(with pulse width of 200usec., duty cycle 1/50), 1mA
Contact bounce less than 10msec
Contact resistance 800. max (200gf pushing)
Insulation resistance 100M.(at D.C.250V)
Withstand voltage A.C.250V. 1minute
Circuit Make contact, 1 circuit
Mechanical Specifications:
Item Normal Key Space Key
Operation Force 45g Typical 55g Typical
Maximum Force 50±20g(After test:50±30g) 65±20g(After test:65±30g)
Click Ratio 10g (min) After Test 10g (min) After Test
Full Travel 3.5±0.5mm N/A
Operating Point 1.0.3.5mm Stroke N/A
Endurance Specifications:
使用寿命1000万次(通过凸轮测试)5日000,000 (by Plunger) : 200gf
OOperating Temperature .5 ~ 50.
Storage Temperature 1.20 ~ 60.
Unless specified in this specification, refer to the standard specification.(S56-0214)
The provisions mentioned on this specification have priority to the standard specification.
There is no Print Screen key on the French Canadian keyboard, however, you may use KeyTweak software to re-program any key to operate as the Print Screen function.
Note: this FAQ is for the GTP-0044 Go!2 Mobile Keyboard.
The Goldtouch Keyboard is a WHQL Certified, Plug and Play device. Windows will automatically detect the device and install Microsoft drivers.
To choose between PC and Mac mode, please use the switch on the back of the keyboard to select your operating system. Please note, keyboards are in PC mode by default.
The keys on the GTP-0044 mobile keyboard are only programmable through the use of third party software such asKeyTweakon PC or Double Command on Mac. Goldtouch cannot provide technical support for third-party software.
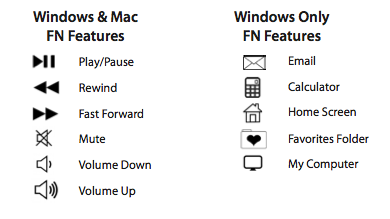
To activate the FN (Function) features on your Goldtouch Go!2 keyboard, press and hold the FN key, and select the following Function Features, outlined in blue (for PC) and yellow (for Mac):
The Goldtouch Go!2 Mobile Keyboard is Plug-and-Play for both Windows® and Mac OS®. The keyboard doesn’t require any additional drivers for installation.
Setting up your new keyboard is easy:
Yes, please use the following setup instructions as a guide:
No, all Goldtouch keyboards are QWERTY for Latin script.
This is an exceptional product designed to be adjusted to suit your individual body requirements, rather than forcing your body to conform to the keyboard. It provides for personal adaptation of the two alphanumeric sections to help you attain relaxation of the muscles and tendons of the hands, wrists, arms and shoulders. In so doing, undesirable awkward postures used in typing can be alleviated.
The Goldtouch Adjustable Keyboard allows for you to arrange your workspace to improve comfort and enhance productivity and efficiency. It has a small footprint and embedded numeric keypad so you don’t need to reach as far to access your mouse. Watch our Video,The New Simple, Part 1: Goldtouch Overviewfor more information.
The serial number is located on the underside of the keyboard. It is the 10-digit code, following the part number, located beneath a bar code. For example “3290000123”.
We recommend that you follow the below adjustment guides to help you setup your Goldtouch Keyboard:
See our video demonstration on how to properly adjust your Goldtouch keyboardhere。
Step One, dialing in personalized comfort.
A leading contributing factor to the development of computer-related repetitive strain injuries is the flat standard keyboard, which places the forearm and wrist in awkward positions for long periods of time.
NOTE: Goldtouch recommends you work in this position for a few days until you’re comfort- able with the split of the panels, compared to your previous keyboard.
Step Two, go Vertical!
Your next adjustment is to correct the inward turn of your wrists or pronation.
NOTE: Always ensure that your fingers or other foreign objects are not in between the keyboard and the locking handle when closing the lever. It’s important NOT to over-adjust the keyboard. See our website www.kudlanka.com for a video demonstration on how to properly adjust your Goldtouch keyboard.
The Goldtouch Adjustable Keyboard is not designed to be split into separate pieces. You should adjust the keyboard vertically and horizontally to fit your particular body type. Separating the Goldtouch keyboard into two pieces voids the product warranty.
不,如果键盘正确地调整,没有bounce should be experienced when typing. It is necessary to set the keyboard up to be stable on its four feet to stop any wobble. Pull the locking bar mechanism out. With the right hand lifting the back of the keyboard from underneath, place the left thumb on the Goldtouch logo and pull the handle back into the locked position. Each half needs to be pretty even for it not to rock or bounce. If the keyboard still wobbles, pull the locking bar out again and adjust it slightly until you feel the two halves are stable.
If the key is not producing any characters or the wrong character, the Keyboard may be defective. Please test the keyboard on another computer system and if it is still experiencing the same results, Please emailSupportfor further assistance.
Some Power management Settings in the Computer System BIOS and in combination with Windows Power Management Settings can cause the USB ports to provide limited or insufficient power needed to operate USB devices.
The system BIOS must be configured for S1 suspend mode. The wake key does not work when the BIOS is configured for S3 standby because the keyboard is not powered.
This is normal. The system fans are typically off during S3 standby.
Please refer to your computer system manual or contact your system manufacture for assistance with BIOS setting adjustments. Note: we are not responsible to damages to your computer system if BIOS settings are adjusted incorrectly.
The power management setup instructions vary depending on the Windows Operating system you are using.
Below are some instructions for configuring the Power management options for Windows 8, Windows 7, Vista and XP.
To activate the Go!2 keyboards embedded numeric keypad:
NOTE:To turn off the Num Lock and FN features, simply press the Num Lock and FN keys to deactivate. The corresponding indicator lights on the status bar will turn off when these functions are deactivated. When Num Lock is turned on, you can easily toggle between regular keyboard mode and the embedded numeric keypad by turning Function (FN) off and on, rather than turning NUMLOCK on and off.
This is commonly an issue with the motherboard. The motherboard needs to be reset, and will only reset if the computer is completely disconnected from its power source.
To resolve the problem follow these simple steps:
Desktop Computer:
Laptop Computer:
To choose between PC and Mac mode, please use the switch on the back of the keyboard to select your operating system. Please note, keyboard are in PC mode by default.
The keys on the GTP-0044W mobile are only programmable through the use of third party software such asKeyTweakon PC or Double Command on Mac. Goldtouch cannot provide technical support for third-party software.
To activate the FN (Function) features on your Goldtouch Go!2 Wireless Keyboard, press and hold the FN key, and select the following Function Features, outlined in blue (for PC) and yellow (for Mac):
To connect your GTP-0044W Go!2 Mobile Bluetooth USB Keyboard, please use the following directions, or watch our YouTube videos for instructions on how to pair your Go!2 Keyboard withPC,Mac,Android, oriPhone/iPad。
Bluetooth Validation
The Goldtouch Go!2 Travel Keyboard is equipped with Bluetooth technology. Bluetooth is a short-range wireless technology that lets you connect multiple computers, input devices, mobile phones, and handheld devices to each other without cables. To use the Goldtouch Bluetooth Keyboard, please check to make sure that your device is Bluetooth capable, and that Bluetooth is turned on. You may check your manufacturer part number or invoice to see if your device is equipped with a Bluetooth Receiver.
If you aren’t sure your device is equipped with Bluetooth technology, please refer to the Bluetooth Validation guide in the Troubleshooting section on page 8 of theGo!2 Wireless Keyboard Manual。确保你的电脑有最新的蓝牙Receiver software installed for your device. These drivers are typically available from your computer manufacturers Support page.
Begin by selecting your operating system, by adjusting the switch located on the back of the keyboard to PC or Mac mode. (Please note, keyboards are shipped in PC mode by default).
Next follow the directions for your specific device:
Bluetooth Pairing with PC
Bluetooth Pairing with Mac
Bluetooth Pairing with Android 3.0 or Older
Note – Android 4 or higher pairs like a PC)
Bluetooth Pairing with Samsung Galaxy